Showing posts with label free patterns. Show all posts

24 May 2011

Knitted chinchilla repost

Reposting this on my craft blog, as Livejournal doesn't seem to be playing nice these days.

I wrote this pattern in 2006, and I suspect I have got better at pattern writing since then. Any errors are therefore because of History.


Knitted chinchilla pattern...


Materials:

Fun fur/eyelash yarn of your choice (uses about 2/3 of a 50g ball)
Base colour DK or aran yarn (same as above)
Pink DK yarn for ears (not much)

2 soft toy eyes, or buttons
Stuffing
A jumbo pipecleaner

Set of 4 6mm DPNs
4mm straight needles

Body

Knitting with the fun fur and base colour together (this makes the fluffy stuff _a lot_ easier to knit) CO 3sts (I used long tail cast on, but if you use another method just add another knit row after the cast on row). Put one stitch on each needle and start working in the round.

All odd numbered rounds - Knit
Round 2 - Kfb every stitch (6sts)
Round 4 - Kfb every stitch (12sts)
Round 6 - Kfb every stitch (24sts)
Round 8 - Kfb every stitch (48sts)
Round 10-14 - Knit
Round 16 - [K2tog, K14] three times (45sts)
Round 18 - [K2tog, K13] three times (42sts)
Round 20 - [K2tog, K12] three times (39sts)
Round 22 - [K2tog, K11] three times (36sts)
Round 24 - [K2tog, K10] three times (33sts)
Round 26 - [K2tog, K9] three times (30 sts)
Round 28 - Knit
Round 30 - K2tog x 15 (15sts)
Round 32 - K2tog x 7, k1 (8sts)

Stuff body firmly. Draw wool through remaining stitches.

Ears

Make 2 in pink yarn. I used two strands at once to ensure the ears would stand up on their own (although my wool was quite thin). Slip the first stitch of every row for a tidy edge.

CO 12sts on 4mm straight needles.
(add an extra k row here if you're not using long tail cast on)
Row 1 - Sl1, Kfb, K to last 2 sts, Kfb, K1. (14sts)
Row 2-5 - repeat row 1.(22 sts)
Row 6-9 - Knit.
Row 10 - Sl1, K2tog, K to last 3 sts, K2tog, K1. (20sts)
Row 11 - Knit.
Row 12 - K2tog x10 (10sts)
Row 13 - Knit.
Row 14 - K2tog x5 (5 sts)
Row 15 - BO.

Tail

Use same yarn as body.

CO 7sts on DPNs. The tail is worked in i-cord.
Row 1-10 - Knit.
Row 11-15 - Increase 1 every row to 12 sts
Row 16-17 - Knit two rows.
Row 18 - K2tog x6 (6sts)
Row 19 - Knit.
Row 20 - K2tog x3 (3sts)
Row 21 - BO.

Assembly

Tail - Fold your pipecleaner in half and stuff it into the tail, poking the pointy ends into the body to anchor it (ow!). You don't need to put stuffing in the tail. Stitch in place.

Ears - Now the ears are very important. The placement and shape of them is important to stop the chinchilla looking like a Furby. I used a real chinchilla for reference, but if you don't have one to hand then I recommend either looking at the picture below or at some pictures of chinchillas to figure out where their ears should be :) Attach ears to body.

Eyes and nose - Either embroider, or attach soft toy eyes or buttons (I'm rubbish at embroidery, so I did the latter). Again, have a look at pictures of some real chins for reference.

And you're done!

Where to attach the ears and tail...

Nibbler refuses to play nice.

I'm happy for you to sell chinchillas made from my pattern, please just include a link to my pattern if selling online.

07 August 2010

Chichester the Pig

Chichester the Pig was born when someone asked me for 26 knitted pigs for an event and I was forced to come up with a pattern that I could knit 26 times without it making me crazy. For me, this means no sewing. I'd just finished making some Mini Aliens from Barbara Prime's pattern and thought her no-sew techniques would be excellent for the borrowing for this project.

A German translation by Julie Röder is available here, and Jen Sloan's adaptation for knitting on two needles is here.


This pattern assumes you know how to knit in the round (using your favourite method, be it DPN, two circulars or magic loop), purl, increase (kfb, kfbf), decrease (k2tog, k3tog), and long tail cast on. I used DK but you could use any yarn, just upsize (or downsize, if you're a masochist) the needles appropriately.


Make bobble (ear): Kfb, turn work, purl 2 sts, turn work, k2tog
Make bobble (leg): Kfbf, turn work, purl 3 sts, turn work, knit 3 sts, turn work, purl 3 sts, turn work, k3tog
Kfbf: knit into front of next st, then knit into back of the st, then into front again. Makes 3 sts from 1.


Round 1: On 3.25mm needles and using DK yarn, long tail cast on 6 sts.
Round 2: Purl around
Round 3: Knit around
Round 4: Kfb around (12 sts)
Round 5: Knit around
Round 6: (Kfb, K1) around (18 sts)
Round 7: Knit around
Round 8: Knit 2 sts, make bobble (ear), knit 3 sts, make bobble (ear), knit 11 sts

Round 9: Knit around
Round 10: Knit 11 sts, make bobble (leg), knit 3 sts, make bobble (leg), knit 2 sts
Rounds 11-13: Knit around
Round 14: Knit 11 sts, make bobble (leg), knit 3 sts, make bobble (leg), knit 2 sts
Rounds 15-16: Knit around
Round 17: K2tog around (9 sts)
Stuff
Run yarn through remaining sts with tapestry needle and fasten. Poke the yarn end out of the pig's bottom and cut it short to make a tail.


I stitched the eyes with black yarn but you could use beads or little circles of black felt glued on. Or googly eyes.

Variations:


Pig Pig (yes, I'm still conjoining everything. What of it?)

Follow the pattern as above until the end of round 14. Then:

Round 15: Knit around
Round 16: (K2tog, K1) around (12 sts)
Round 17: Knit around
Round 18: K2tog around (6 sts)
Round 19: Knit around
Round 20: Purl around
Run yarn through remaining stitches. Use the yarn tail to try and make this snout look like the snout at the other end.


Baby Pig for Piggybacking Purposes (OK, I think this is the smallest I can make pigs)


Make bobble (baby leg): Kfbf, turn work, purl 3 sts, turn work, k3tog


Long tail cast on 3 sts
Round 1: Purl around (this is fiddly. Persevere.)
Round 2: Knit around
Round 3: Kfb around (6 sts)
Round 4: (Kfb, K1) around (9 sts)
Round 5: Knit around
Round 6: K1, make bobble (ear), k1, make bobble (ear), K2, Kfb, K2 (10 sts)
Round 7: knit around
Round 8: K6, make bobble (baby leg), k1, make bobble (baby leg), k1.
Round 9: knit around
Round 10: K6, make bobble (baby leg), k1, make bobble (baby leg), k1.
Round 11: Knit around
Round 12: K2tog around
Stuff (with a pointy thing)
Run yarn through remaining sts and make tail as per big pig.


Wingalid Pig


For the wings, with DK yarn and a 3mm hook:
Ch 4
Skipping first ch, sc 3 into ch, turn work
*ch3, sc*, repeat twice more
fo, attach to side of pig

I'm happy for you to sell Chichesters made from my pattern, please just include a link to my pattern if selling online.

23 June 2010

Jen the Travelling Bunny

From Jen the Bunny


Jen the Travelling Bunny was found on Jen's doorstep with a mysterious note. Since then she has travelled around the world, looking slightly concerned.

This is not the pattern for Jen the Travelling Bunny - I did not make her! It is just a tribute (also, I haven't tested it. Let me know if it works!).

3mm hook, DK yarn (I used black acrylic and Debbie Bliss Cashmerino DK)
Worked in rounds so the stripes look better, so you'll need to add a ch1 at the beginning of each round and join with a slip stitch at the end of each round. You can work it in a spiral if you are opposed to rounds though (use a stitch marker to mark the beginning of rounds).
All terms are US terms, sorry. Assumes basic amigurumi knowledge (that you know how to increase, decrease and single crochet)

Body
(you're starting at the bottom of the body and working up)
SC 6 into magic ring
inc around (12 sts)
*1sc, inc* around (18 sts)
*2sc, inc* around (24 sts)
*3sc, inc* around (30 sts)
sc around in back loop
sc around for 2 rows
change colour
sc around for three rows
change colour
sc around for 3 rows
change colour
sc around
*sc, dec* around
sc around
change colour
sc around
stuff body (Jen has grit in her bottom to help her stand up)
*sc, dec* around
sc around

(thus ends the body and begins the head)

*sc, inc* around
sc around
*2sc, inc* around
sc around for four rows

(If you're using safety eyes you'll want to attach them now. Jen's bigger eye is a button with a hole drilled in it, with a safety eye through the hole)

*sc3, dec* around
*sc2, dec* around
*sc, dec* around
keep dec-ing until the hole is closed up.

ears (make 2!)
sc 6 into magic ring
inc around (12 sts)
*sc1, inc* around
sc around for two rounds
*sc1, dec* around
sc around for four rounds

(stuff ear)
*sc1, dec* around
sc around
fasten off

Sew on ears, you're done!


From Jen the Bunny

Let me know if you're interested in selling items made from my pattern, I'll probably say yes in exchange for a credit and a linkback.

Amigurumi tips

I've got a few amigurumi patterns I've been working on, but find myself rewriting the same general advice over and over, so I thought I'd collate my general advice here so I can link to it :)

Helen's tips for successful crochet amigurumi:

1. Eyes (and mouths)

I've found that toys usually look better if you use safety eyes, rather than sewing them on. I tend to buy the little black plastic ones by the bucketload. Button eyes are only really good if you're going for ultracrafty/shabby chic/vintage, otherwise they tend to look a bit amateurish. I've never felt the need to give my amigurumi mouths. This is probably psychologically indicative of something.

2. Eye placement

This is probably the most important tip. Take time with eye placement, it is the number 1 thing that defines the personality of your amigurumi. Howie Woo has written a great article on this: Fundamentals of Cuteness 101 . As a general rule, I tend to favour widely spaced eyes about halfway up the head (depending on the physiology of the animal in question, of course).

3. Stuffing

Second most important tip! Take time with stuffing. Make sure any small appendages are stuffed first, using a crochet hook or DPN or barbeque skewer or whatever is to hand (lick the barbeque sauce off first). Make sure each part is firmly stuffed (but not so stuffed it starts to poke through the crochet!) so it is nicely rounded. As with people, if your amigurumi is nicely rounded it will be more pleasing.

4. Yarn

You can amigurumi with anything. Seriously. The cheapest, nastiest acrylic you can find will provide just as good a finished product (although the squeaking on the crochet hook may drive you mad).

5. Hooks

My gauge is screwed (I crochet pretty loosely). But as a rule of thumb, you should be using a crochet hook that gives you a fabric that is nicely floofy but tight enough to not have gaps when slightly stretched.

6. Approximate is OK

Amigurumi is forgiving with errors, mathematical inconsistencies and, um, design innovations. Because stuffing is so important, if your stitch counts don't add up, don't worry. Chances are everything will look fine at the end, even though it may not correlate exactly with the pattern.

7. Abbreviations

I'm a lazy, lazy pattern writer. Here are the abbreviations I use:
sc: single crochet (in American, double crochet in UKese.) It's the awesome little square stitch with only two loops, anyway.
inc: sc twice in the same stitch
dec: one of these
fo: fasten off
magic ring: nifty way of beginning without leaving a hole. Instructions here
*things in asterisks* - repeat until end of round/row
Pick up / pick up and sc - To avoid sewing on, I often crochet small extremities directly onto the amigurumi. Just stick your hook through a stitch and pull up a loop, ch1 and sc in same stitch, and then carrying on scing into as many stitches as you need.

I'm sure I'll add to this in the future!

16 February 2009

Free charts

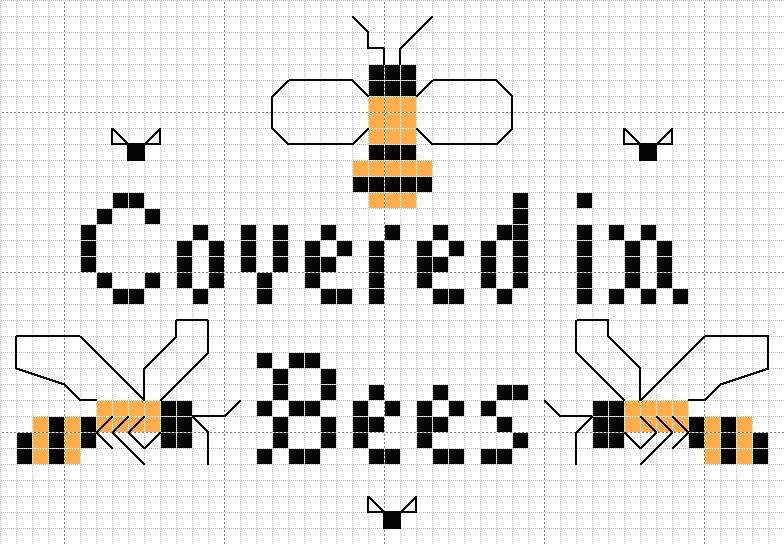
I've added the digitised charts for two more old cross stitch projects, the Eddie Izzard inspired Covered in Bees and a tribute to the famous sailors from Black and White. Links are over in the sidebar.

15 February 2009

Summer Moth

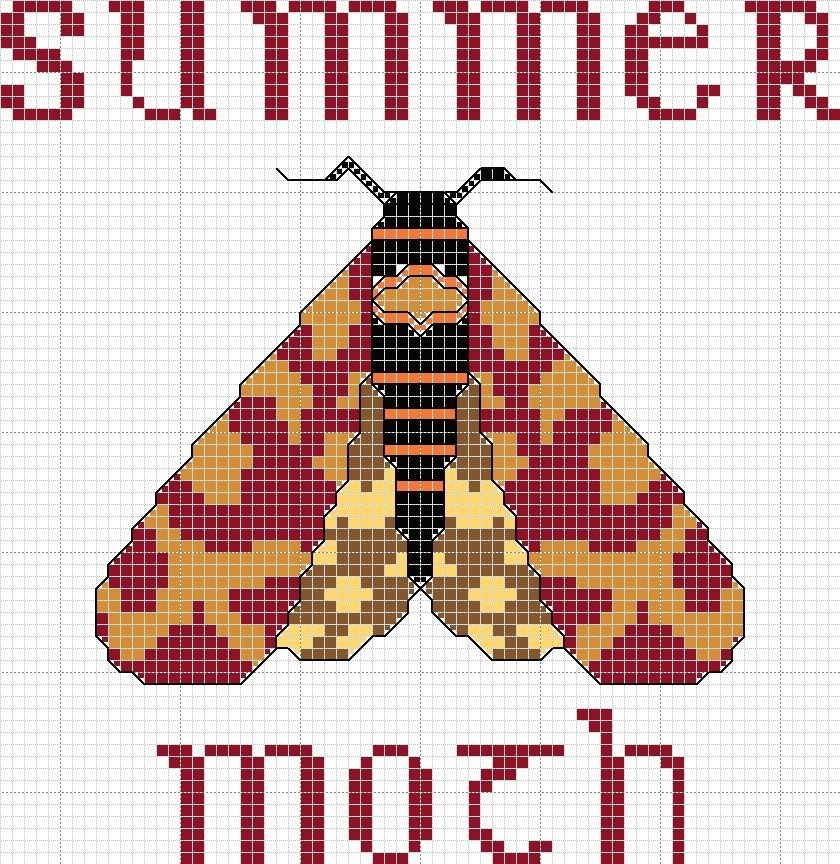
I'm digitising a load of bits of scribbly paper. Want a free cross stitch chart?

Photobucket

I made this for a friend last year, but figured that it was broad enough to appeal to the internets. I spent bloody ages looking for a cross stitch pattern for a moth, then gave up and made my own.

Chart is available here.

07 January 2008

Christamocalypse crafting part deux - Eddie Izzard inspired...


Hey, guess what? I'm covered in bees...

COVERED IN BEES!

(ahem)

More to come later, though I'll wait a bit so not to kill people on the LJ syndicated feed. Cos they moan at me.

Free chart here.